DIY Synthesizer Cabinet

If you're having difficulty getting your modular synthesizer going because of the high cost of a cabinet, then this page is for you.
With about $40 of parts from a hardware store (Home Depot or Lowes), and an hour or two of pure construction hell (not really, this is pretty simple stuff), you can have a decent synthesizer cabinet for your Synthesizers.com system for a fraction of the cost of a pre-built one. Sure, it won't be a furniture-quality beauty made from solid walnut, but it will certainly allow your Synthesizer craving to move forward.
Don't worry, it will be very easy, will even link to everything you need!
Getting Started
To construct the cabinet you'll need 3 shelves, 8 L-brackets, and 1/2 x 3/4 rectangle trim stock.

Most home improvement stores sells shelves. They range from $5 to $15 and come in various depths (8" and 12" are common), lengths (24", 36", 48" are common), and coverings (oak, black, white are common). I used Rubbermaid wood shelves that are 7.8" deep and 35.8" long with a fake oak covering. These shelves are about 3/4" thick.
It's best to use an entire uncut shelf for the top and bottom so the ends will look good.
Modules are multiples of 2-1/8" wide, so,
- A 24" shelf has (24 - 3/4 - 3/4 = 22-1/2" / 2-1/8" = 10 module spaces.
- A 36" shelf has (36 - 3/4 - 3/4 = 34-1/2" / 2-1/8" = 16 module spaces.
- A 48" shelf has (48 - 3/4 - 3/4 = 46-1/2" / 2-1/8" = 21 module spaces.
The third shelf will be cut into two 9" sides so it can be short (24").
Links to shelf products:
Home Depot (easiest to find right size and color for your liking)
Lowes (more limited availability, but may be easier for you to find)
L-BracketsYou'll need a total of 8 L-brackets to attach the sides to the top and bottom. They usually come in packages of 4 along with screws. 1-1/2" or 2" work best. Steel brackets are much stronger and stiffer than solid brass. The next thing to pay attention to is screw length which should be shorter than the thickness of the shelf material. You'll probably need to buy 32 shorter screws (4 per bracket) - #6 x 1/2 phillips wood screws will probably work fine.
Home Depot Bracket and Screws (you need 2 packs of brackets, and 3 packs of screws)
Lowes Bracket and Screws (you need 2 packs of brackets and 2 packs of screws)
Trim Stock for RailsThe module mounting rails need to be 1/2" x 3/4" trim stock. It's important that the 1/2" dimension is exact - 5/8" won't work. The 3/4" dimension needs to be a minimum of 3/4", but can be 1" or even 1-1/2" - if longer than 3/4" you'll have to cut a notch to clear the L-brackets. Most home improvement stores carry this in pine, but oak or some other hardwood would be even better.
Home Depot (Sold by the foot, buy according to the shelf size you purchased)
Lowes (Sold in 8 ft sections)
Handles, feet, back panels, nails, paint, etc.While you're at the store, look around for accessories such as handles and feet. When selecting feet, make sure to pick rubber instead of the foam type so the cabinet will not slide when patching.
Home Depot Feet Handles (will leave it to you to pick a handle you like)
Lowes Feet Handles (again, up to you if you want a handle)
If you want to put a wooden panel on the back of your cabinet, pick a 1/4" material such as paneling, very thin plywood, or hardboard. Often these are sold in smaller precut pieces (24"x48") by the store so you don't have to buy a whole sheet. You can even use perforated hardboard to improve the cabinet's air flow. A rear panel will make the cabinet much more stable but it's not necessary.
Home Depot Hardboard (they sell in 2X4 configuration)
Lowes Hardboard (Only have 4X8, you can ask them to cut down)
You'll need some finishing nails (1") or wood screws (#6 x 1") to attach the rails. I included a link if you need it, most people have something that will work.
Home Depot Finishing Nails
Lowes Finishing Nails
If you want the rails and/or the back to be black, pick up a cheap can of flat black spray paint. You'll have 3/4 of the can left over when done.
Parts List
2) 36" or 48" shelves
1) 24" shelf to match
8) 1-1/2" or 2" L-brackets
32) #6 x 1/2" phillips wood screws
16 foot of 1/2" x 3/4" wood trim stock (hardwood if possible)
4) Rubber feet
Cutting Corners
There are a few things to reduce the cost of this inexpensive cabinet even further.
First, you can experiment with simply nailing or screwing the sides together instead of using L-brackets. Pre-drilling holes and long coarse-thread screws is the key to getting this to work.
The 1/2" trim stock used for the rails could be cut in half by not having rear mounting rails. Also, most cabinet shops throw away tons of this type of drop all the time so you can probably pick some up for nothing.
Instead of feet, you can simply pour a blob of hot glue on each corner. It works!
Instead of shelves, locate some excess material from a cabinet shop or a new-home building site. Even 3/4" plywood could be used and a dab of paint could make it look purty too.
Cutting the Sides
Cutting the sides is the most critical thing in this project. Without properly cut sides, the modules will not fit in the cabinet. It's important that the sides be exactly 9" tall (long) and very square. Use an accurate ruler - metal is best and a fine-tip pencil or marker.
It is possible to do this by hand but use a square to make a cutting line and watch carefully as you cut. It's best to use a mitre saw or radial arm saw if you have one or can borrow one. A local cabinet shop would probably do it for nothing.
When done, you should have 2 perfect sides that are exactly 9" tall.

Attaching the Sides
You might find it easier to attach the rails before attaching the sides for better access. If so, jump to the next section (kind of recommended).
First thing to check for is the screw length. If the screws are longer than the thickness of the shelf material then you'll need to use shorter screws - see above. Start by attaching a side to the bottom. Place the L-Bracket 1-1/4" from the edge. Make sure the side is flush with the edges of the bottom. Install the screws in the exact center of the L-bracket holes - an electric screwdriver works great. It won't be necessary to pre-drill the holes unless you'll be installing the screws by hand. In that case, simply hammer a tiny nail where the screws go, then pull them out with pliers to make a starter hole for the screws.

Cutting the Rails
Measure the inside of the cabinet and cut 4 rails from the trim stock. It's ok if the rails are slightly (1/8") shorter than need be. If you want to paint the rails, now is the time - flat black is best.

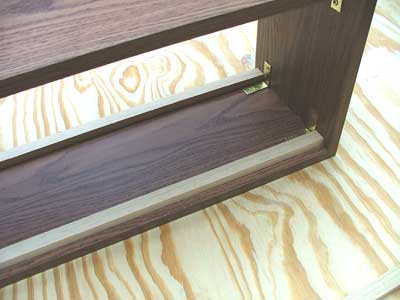
Installing the Rails
The rails will get mounted right next to the L-brackets. If your rails are 3/4" deep and you mounted the L-brackets 1-1/4" from the edge, this will make the modules recessed 1/2" from the front edge of the cabinet.
Nailing the rails can be tricky. Pre-install the nails at slight angles so you can hit them from outside the cabinet with a hammer. If using screws, you'll have to pre-drill the rails to prevent them from splitting. A brad nailer makes this job really easy. If you have patience and some clamps, you can also just glue and clamp them in place with wood glue and leave it for a day.
Mount 2 rails on each side of the cabinet. The rails in the back can be used to mount power modules, or to mount the optional rear panel.
Mounting the Power Supply
The power supply should be mounted so that it allows as much room as possible for modules. Most Synthesizers.com modules only protrude 2.5" behind the panel. Use steel L-brackets. It might be necessary to use a stubby screw driver, a right-angle drill head, or take the top panel off to access the screws. The DC cable harness can be attached to the power supply using a plastic ziptie. Add a Q137 Power Module to finish out the power supply. This particular power setup is good for up to 66 spaces of modules, so you can share power out to other cabinets.
Mounting Modules
Turn the cabinet so the back is on the ground. Insert modules or blank panels into the cabinet and push them together leaving a gap on each side of the cabinet. Make sure the top edges of each module are aligned. Use a fine-tip sharpie to make a small dot in the center of each mounting hole. Drill a small hole (much smaller than the mounting screws) at each location. These holes should be about the diameter of a toothpick or a small finishing nail.
Attach a power cable to each module and secure it using 6 x 1/2" wood screws.
Proceed to Synthesizer Bliss
- Chuck Wrote: Wow. Really brings the cost of entry down and the ease of what you've created here is stunning. But those walnut cabinets -- I think I'd feel obligated to just suck it up and accept the cost -- the look is amazing -- part of what gives the .com such an aura of being an *instrument*, and aura definitely means something. But you da man for coming up with this. Because keeping some money in the bank has a bit of an aura too.
- TW Wrote: WOW Roger - this is just amazing!!! Putting up this detailed information with such high quality is superb. Coming from a manufacturer that also sells cabinet is beyond praise. You are really one-of-a-kind.